Table of Contents
ToggleKey Takeaways
- Effective workstation arrangement is crucial for optimal results.
- Proper cleaning materials are necessary for a successful finish.
- Application methods significantly impact the quality of the refinishing.
- Repair implements are essential for addressing imperfections.
- Drying and curing apparatus play a vital role in the process.
- Maintenance instruments ensure longevity of the refinished surface.
- Identifying and resolving frequent problems is key to a smooth workflow.
Benefits of Adding a Protective Finish
A protective finish significantly enhances the longevity of acrylic surfaces. It shields them from scratches, UV rays, and other environmental factors that can lead to deterioration over time. This added layer not only preserves the aesthetic appeal of the acrylic but also reduces the frequency of maintenance required, allowing for a more durable and resilient finish.
Moreover, applying a protective finish can improve the overall performance of the acrylic material. It can enhance gloss and clarity, making the surface look fresh and vibrant. This type of finish can also provide additional benefits such as water resistance and ease of cleaning, making everyday upkeep simpler and more efficient for users.
Workstation Setup
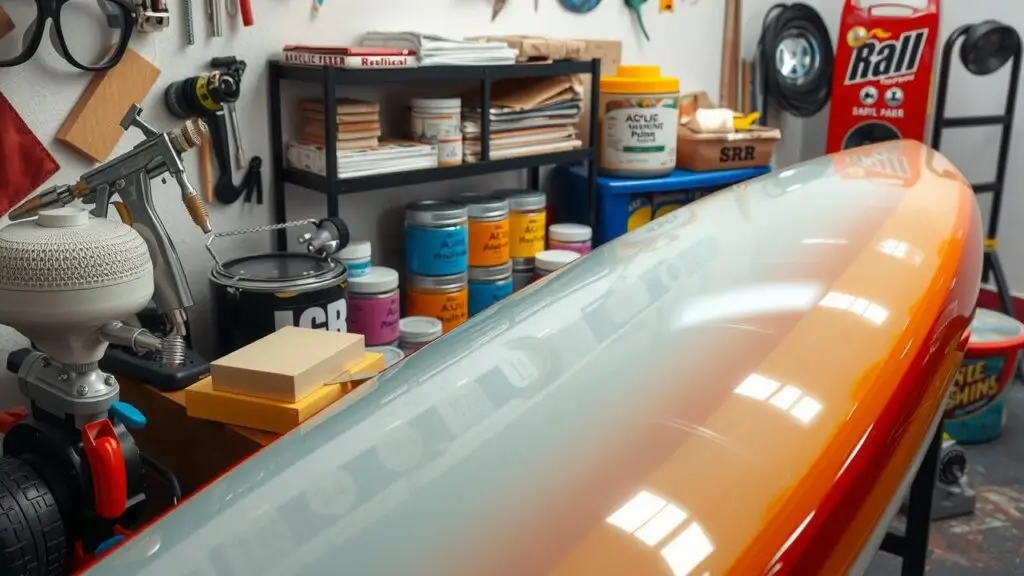
A well-organized workstation plays a crucial role in successful acrylic refinishing. Ensure that your workspace is adequately illuminated, allowing for clear visibility during the intricate tasks involved in refining acrylic surfaces. A sturdy workbench or table provides a stable platform for your projects. Consider including shelving or storage containers to keep tools, materials, and supplies within easy reach, which can enhance your efficiency and prevent unnecessary disruptions.
Ventilation is another key factor in setting up your workstation. Working with acrylics and associated chemicals can create fumes that may be harmful if inhaled over extended periods. Utilizing a space with good airflow or incorporating exhaust fans can mitigate this risk. Additionally, having easy access to cleaning supplies can help maintain a tidy workspace, ensuring smoother project progression and safeguarding against contamination of surfaces.
Creating an Efficient Refinishing Area
A well-organized refinishing area can greatly enhance productivity and reduce the likelihood of errors. Start by selecting a dedicated space that is well-ventilated and free from dust and debris. Position your workbench at a comfortable height to reduce strain during long hours of work. Keep essential tools within reach, and designate spots for materials to avoid clutter. Good lighting is crucial. Consider overhead lights or a portable work lamp to illuminate your workspace clearly.
Incorporating storage solutions can further streamline your refinishing operations. Use bins or shelving to categorize supplies, making it easy to locate everything from sandpaper to coatings without delay. If possible, establish a designated area for drying pieces, ensuring that they remain undisturbed while curing. Regularly reassess the layout of your workstation to accommodate new tools or techniques you might adopt. A thoughtfully arranged area fosters an efficient workflow, ultimately leading to higher quality results.
| Tool/Material | Storage Solution | Usage |
|---|---|---|
| Sandpaper | Bins | Used for surface preparation and smoothing |
| Paint Brushes | Wall-mounted holder | For applying paints and finishes |
| Coatings | Shelving unit | For clear coats, stains, and sealers |
| Safety Gear | Cabinet | Includes masks, gloves, and goggles |
| Tools (screwdrivers, wrenches) | Toolbox | For assembly and disassembly of furniture |
Cleaning Supplies
The foundation of a successful acrylic refinishing project lies in using the right cleaning supplies. A thorough cleaning of the surface is essential before any refinishing begins. Mild detergents combined with soft sponges or cloths are effective for removing dirt and grime. It’s crucial to avoid abrasive cleaners, as they can damage the acrylic surface. Once cleaned, a lint-free cloth should be used to ensure no residues remain, as these can interfere with the application of finishing products.
In addition to basic cleaning agents, specialized products designed specifically for acrylic are available. These products not only clean but also help to prepare the surface for refinishing by enhancing adhesion. Using a plastic scraper can assist in lifting stubborn residues without scratching the surface. Keeping cleaning supplies organized and easily accessible is critical for maintaining workflow efficiency. Regularly stock your cleaning materials to ensure they are always at hand when needed for upcoming projects.
Best Products for Maintaining Tool Hygiene
Maintaining tool hygiene is vital in acrylic refinishing to ensure quality results and extend the lifespan of your equipment. One of the most effective products for this purpose is a high-quality solvent-based cleaner. These cleaners are specifically formulated to dissolve residues and residues left behind from various acrylics and finishes. Additionally, using a dedicated brush for cleaning helps prevent cross-contamination between different projects.
Another essential product is disinfecting wipes. They provide a quick and convenient way to sanitize surfaces and tools after use. These wipes are useful for cleaning handheld tools, workstations, and even spray equipment. Regular use of disinfectants reduces the risk of introducing contaminants into future projects, contributing to a smoother refining process. Investing in these products ensures that your tools remain in optimal condition.
- Regularly clean tools after each use with a solvent-based cleaner.
- Always store tools in a clean and dry environment.
- Use dedicated brushes for cleaning specific types of tools and materials.
- Invest in high-quality disinfecting wipes for quick sanitization.
- Maintain a regular cleaning schedule to prevent buildup of residues.
- Educate yourself on the best practices for tool sanitization.
- Consider using a UV sterilizer for additional disinfecting power.
Application Techniques
Achieving a smooth and even finish during the acrylic refinishing process requires precise application techniques. Start by selecting a high-quality spray gun or brush that suits the type of project. For spray applications, maintain an even distance from the surface to prevent drips and runs. When brushing, use long, even strokes to minimize brush marks. It’s crucial to apply thin layers rather than one thick coat, allowing each layer to dry adequately before proceeding.
Practice is essential to master the application technique. Testing on a small area or scrap piece of acrylic helps gauge the right pressure and consistency. Pay attention to environmental factors like temperature and humidity as these can affect drying times and finish quality. Patience and attention to detail during the application will yield a more professional-looking result, making the refinishing last longer and enhance the overall appearance.
Tips for Achieving a Smooth Finish
Achieving a smooth finish on acrylic surfaces requires attention to detail and the right application techniques. Start by ensuring that the surface is clean and free of dust or debris. Use fine-grit sandpaper to lightly scuff the area before applying the finish. This helps create a key for the new layer and promotes better adhesion. When applying the finish, ensure even coverage by using a high-quality brush or roller. Move slowly and steadily to avoid streaks or bubbles.
It’s also beneficial to apply multiple thin coats rather than one thick layer. Thin layers dry more evenly and reduce the risk of imperfections such as runs or sags. Allow adequate drying time between coats, following manufacturer recommendations. Lightly sand between each coat with fine-grit sandpaper. This step enhances the bond between layers while smoothing out any minor imperfections, resulting in a glass-like finish that’s visually appealing and durable.
Repair Tools
Acrylic surfaces often incur scratches, cracks, and other imperfections that require reliable repair tools. Essential items like sandpaper, patching compounds, and acrylic adhesive play a pivotal role in restoring surfaces to their original condition. Fine-grit sandpaper helps smooth out rough areas while ensuring the repair blends seamlessly with the surrounding surface. Patching compounds designed specifically for acrylic materials can fill in deeper scratches and cracks, providing a solid foundation for further refinishing.
In addition to basic tools, having a heat gun can assist in softening the material, making it more malleable and easier to work with during repairs. A scraper can help remove any excess adhesive or compound that may have overflowed during the filling process. Employing these repair tools effectively will not only extend the lifespan of acrylic surfaces but also enhance the overall aesthetic. Properly addressing imperfections is crucial for maintaining the integrity of the finish and ensuring a high-quality appearance.
Essential Items for Fixing Imperfections
Addressing imperfections in acrylic surfaces requires a thoughtful selection of repair tools. Sanding block sets come in various grits, allowing for precise smoothing of dents or scratches. Using a variety of abrasives helps to gradually refine the surface, removing visible flaws without causing further damage. Additionally, a heat gun can assist in reshaping minor distortions, providing a practical solution for deeper imperfections.
An essential item for repairing cracks is a specialized acrylic adhesive. This type of glue offers strong bonding capabilities while maintaining the flexibility needed for acrylic materials. Applying the adhesive meticulously ensures a neat finish, reducing the need for additional sanding later. A putty knife can help in spreading the adhesive evenly, creating a seamless repair. For smaller imperfections, a touch-up kit with color-matched filler can also be immensely beneficial in restoring the original appearance.
Drying and Curing Equipment
Selecting the right drying and curing equipment is crucial for achieving optimal results in acrylic refinishing. A controlled environment facilitates quicker drying times and enhances the overall finish. Investing in heat lamps can provide targeted warmth, accelerating the curing process while maintaining quality. Additionally, utilizing fans can help circulate air, ensuring even drying and preventing dust from settling on freshly finished surfaces.
Humidity and temperature control also play a significant role in the drying phase. Using a dehumidifier will remove excess moisture from the air, reducing the risk of imperfections like bubbles or streaks. Properly timed intervals between coats can further enhance the final outcome. By carefully managing these factors, refinishing projects can see substantial improvements in both durability and visual appeal.
Optimizing the Drying Process
Proper ventilation is crucial when it comes to drying acrylic finishes. Ensure that the workspace is well-ventilated by using fans or opening windows. This allows for better air circulation, which can help speed up the drying process and reduce the risk of dust or debris settling on the surface. Additionally, controlling the temperature and humidity levels in your work area can further optimize drying times. Ideal conditions typically range between 65°F to 75°F, with humidity levels kept below 50%.
Applying a thin, even layer of finishing material can also enhance drying efficiency. Thick applications may take significantly longer to cure, resulting in potential bubbles or imperfections. Investing in a dehydrator can provide consistent heat and encourage faster evaporation, leading to a smoother finish. Always allow sufficient time for each layer to dry fully before applying additional coats or detailing. This approach ensures that the final product is durable and visually appealing.
Maintenance Tools
Maintaining acrylic surfaces involves more than just surface cleaning. A few essential tools can help preserve the integrity and appearance of your projects. Microfiber cloths are a staple, as they effectively lift dust and reduce scratches when cleaning. Additionally, soft-bristle brushes can assist in reaching intricate details and corners that a cloth might miss. These tools are gentle yet effective, ensuring that surfaces remain free of debris without damaging the acrylic.
Regular upkeep also benefits from specialized maintenance products. An appropriate acrylic-friendly cleaner can help remove stubborn stains while providing a soothing shine. A UV protectant spray is another important addition, as it helps guard against sun damage, which can cause colors to fade over time. Incorporating these products into your routine ensures the longevity and visual appeal of acrylic surfaces.
Keeping Your Acrylic Surfaces Looking New
To maintain the pristine look of acrylic surfaces, regular cleaning is essential. A gentle cleanser and soft cloth can help remove dust and grime without scratching the material. Avoid abrasive cleaners and tools, as these can damage the surface finish. Instead, opt for microfiber cloths that trap dirt effectively while being gentle on the acrylic.
Periodic polishing can restore shine and luster to your acrylic surfaces. Using a non-abrasive acrylic polish will help eliminate minor scratches. Always follow the manufacturer’s instructions for best results. Applying a protective coating can also provide an additional layer of defense against wear and tear, prolonging the life of the surface and keeping it looking fresh for years.
Troubleshooting Common Issues
Refinishing acrylic surfaces can come with its share of challenges. One common issue is bubbling, which often occurs due to trapped air during the application process. Ensuring a proper application technique, such as using even strokes and maintaining consistent pressure, can help reduce the likelihood of bubbles forming. If bubbles do appear, lightly sanding the area followed by a reapplication can often resolve the issue.
Another frequent problem is the occurrence of unsightly streaks or uneven finishes, which may be caused by using contaminated tools or applying products in adverse weather conditions. Always ensure that your tools are clean and free of debris before starting your refinishing project. Additionally, working in a controlled environment with stable temperatures will yield better results, as fluctuations can affect the curing and drying processes.
Identifying Problems in the Refinishing Process
Common issues during the acrylic refinishing process can stem from inadequate surface preparation. If the surface is not properly cleaned and sanded, imperfections like scratches and uneven textures can become more pronounced after refinishing. Additionally, dust particles can settle into the finish before it dries, resulting in a cloudy or gritty appearance. Ensuring a clean and smooth surface before application can prevent many of these problems.
Another frequent complication arises during the curing phase. Variations in humidity and temperature can significantly impact the drying time and overall finish quality. If the conditions are too humid, the finish may take longer to set, leading to potential smudges or fingerprints if touched prematurely. Monitoring the environment and allowing sufficient drying time is crucial in achieving a professional-grade result.
Conclusion
In summary, successful acrylic refinishing requires the right tools and techniques. From setting up an efficient workstation to selecting the appropriate cleaning supplies, each step plays a critical role in achieving a flawless finish.
Ongoing maintenance and a proactive approach to troubleshooting common issues can further enhance the longevity of your refinished surfaces. By consistently using the best practices outlined in this article, you can ensure that your acrylic surfaces not only look their best but also stand the test of time.
FAQS
What are the benefits of adding a protective finish to acrylic surfaces?
Adding a protective finish enhances the durability of acrylic surfaces, helps resist scratches and UV damage, and maintains the aesthetic appeal by providing a glossy or matte look.
How can I set up an efficient workstation for acrylic refinishing?
An efficient workstation should have ample space, good lighting, proper ventilation, and organized tools and supplies. Consider using a sturdy workbench and keeping everything within reach for optimal workflow.
What cleaning supplies are essential for acrylic refinishing?
Essential cleaning supplies include mild soap, water, microfiber cloths, isopropyl alcohol, and specific acrylic cleaners to ensure surfaces are free from dirt and contaminants before refinishing.
What are some tips for achieving a smooth finish when applying acrylic?
To achieve a smooth finish, ensure the surface is well-prepped and clean, use high-quality applicators, apply thin and even coats, and allow adequate drying time between applications.
What tools are considered essential for fixing imperfections during the refinishing process?
Essential repair tools include fine-grit sandpaper, polishing compounds, applicators, and fill materials specifically designed for acrylic, which help in addressing scratches, chips, and other imperfections.