Table of Contents
ToggleKey Takeaways
- Coating the Tub Surface
- Drying and Setting Duration
- Concluding Enhancements Post-Refinishing
- Caring for Your Recently Finished Tub
- Frequent Errors to Steer Clear Of
- When to Seek Expert Help
- Expense Comparison: Do-It-Yourself vs. Professional Refinishing
Tips for Proper Mixing Techniques
Acrylic bathtub refinishing requires careful attention to detail, especially when it comes to mixing your coatings. Begin by reading the manufacturer’s instructions thoroughly to ensure an accurate understanding of the required ratios. Use a clean mixing container and tools to prevent contamination. Stir the mixture slowly but thoroughly, incorporating all components to achieve a uniform consistency. Avoid over-agitation, as this can introduce air bubbles that may affect the final finish.
Color matching is also crucial for a flawless outcome. If your refinishing kit includes a pigment, add it gradually while mixing, checking the color frequently until you reach the desired shade. This cautious approach prevents the need to start over if the color turns out too dark or light. Once mixed, use the product within the time frame indicated by the manufacturer to achieve the best results.
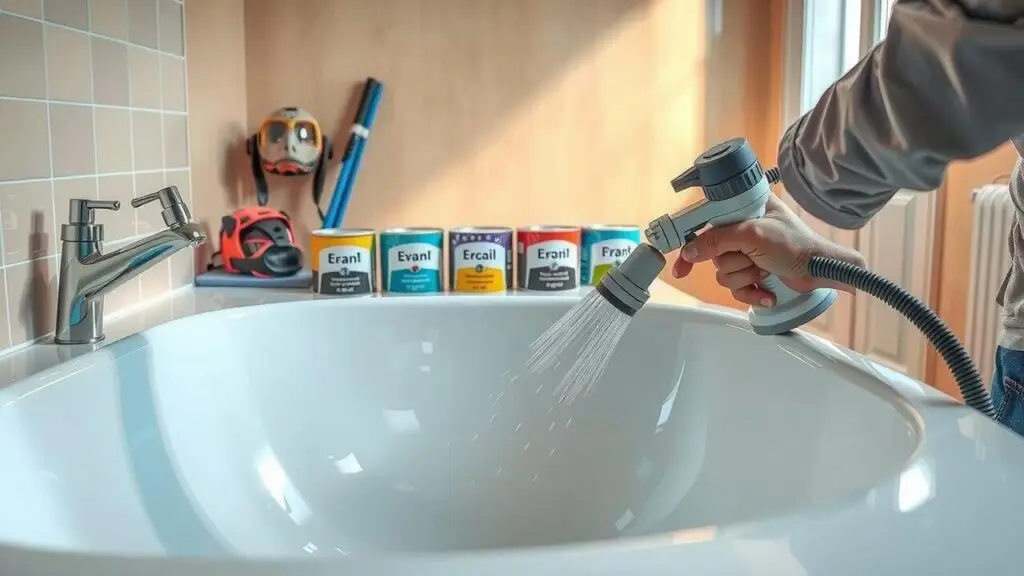
Painting the Bathtub Surface
Before applying paint, ensure the bathtub surface is clean and properly prepared. Any imperfections, such as scratches or chips, should be filled and sanded down. Proper surface preparation enhances paint adhesion, leading to a smoother final product. Using a quality primer specifically designed for acrylic surfaces can also promote better paint adherence and durability.
When applying the paint, use a sprayer or a high-quality brush to ensure an even application. Apply the paint in thin, consistent layers to avoid drips and runs. Be mindful of the recommended drying time between layers, as this can significantly impact the finish quality. A well-painted surface not only improves aesthetics but also extends the lifespan of the refinishing job.
Techniques for Achieving an Even Finish
To achieve an even finish during the refinishing process, it is essential to use a high-quality spray gun for application. A spray gun allows for better control over the paint flow and distribution compared to traditional brushes or rollers. When spraying, maintain a consistent distance from the surface to avoid drips and ensure uniform coverage. Start from one end of the tub and move steadily to the other, overlapping each pass slightly to prevent any missed spots.
Another useful technique is to apply multiple thin coats rather than a single thick one. This approach allows the material to dry more evenly and reduces the likelihood of imperfections. After each coat, inspect the surface for any irregularities and lightly sand between layers if necessary. This method not only enhances the smoothness but also promotes better adhesion for subsequent layers. Taking your time with the application and focusing on the details will contribute significantly to a professional-looking finish.
Drying and Curing Time
After applying the final coat, allow the bathtub to dry for several hours before considering it usable. The drying time can vary depending on environmental factors such as temperature, humidity, and ventilation. Generally, a well-ventilated space at a moderate temperature will aid in faster drying. Be sure to check the manufacturer’s recommendations for the specific product used, as this can provide a clearer timeline for drying.
Curing time is distinct from drying time and is essential for the longevity of the refinishing job. This process allows the coating to harden fully, ensuring durability and resistance to wear. Curing typically takes anywhere from a few days to a week, depending on the material and environmental conditions. During this time, it is advisable to minimize usage of the bathtub to protect the freshly finished surface from any potential scratches or damage.
Factors That Affect Drying
Several factors play a crucial role in how quickly the refinishing material dries on an acrylic bathtub. Humidity levels in the environment can significantly influence drying time. High humidity can lead to slower drying and may affect the curing process, resulting in an uneven finish. On the other hand, lower humidity levels can help accelerate drying, but extreme dryness may also lead to cracking or other issues.
Temperature is another key factor that can impact drying times. Ideally, a warm environment allows for better evaporation of solvents present in the refinishing products. Cold temperatures can prolong the drying process, making it essential to monitor the room’s climate. Proper ventilation is also important. Good airflow helps remove moisture and odors, speeding up drying while ensuring a smoother application and finish.
| Factor | Effect on Drying Time | Recommended Conditions |
|---|---|---|
| Humidity | High humidity slows drying; low humidity accelerates drying | 30-50% humidity for optimal drying |
| Temperature | Warm temperatures promote evaporation; cold temperatures prolong drying | Ideal temperature between 70°F to 85°F (21°C to 29°C) |
| Ventilation | Good airflow removes moisture, speeding up drying | Ensure adequate ventilation, such as open windows or fans |
| Application Thickness | Thicker layers take longer to dry compared to thinner ones | Apply thin, even coats for faster drying |
Final Touches After Refinishing
Once the refinishing process is complete, it’s essential to check for any imperfections or areas that may need additional attention. Carefully inspect the surface for uneven spots or bubbles that might have formed during the application. If you find any flaws, consider lightly sanding the affected areas and applying an extra coat of the refinishing product. This step ensures a smooth, flawless finish that enhances both the appearance and durability of your tub.
After addressing any imperfections, focus on the edges and corners of the bathtub. These areas often require specific detailing to ensure the refinished surface adheres properly and looks uniform. Use a small brush for precision work, and check that the tub’s hardware, such as faucets and handles, is clean and free of residue. A final wipe down with a soft cloth can help eliminate any dust or debris, leaving the bathtub ready for use and ensuring a polished, professional-grade look.
Ensuring Quality and Longevity
Properly finished acrylic bathtubs can provide a stunning appearance for years, but certain steps must be taken to ensure their longevity. Regular inspections can help identify any signs of wear or damage early on. Preventative maintenance is crucial; this includes avoiding harsh chemicals during cleaning and using soft sponges to prevent scratching. The environment also plays a role in longevity. A well-ventilated bathroom can help prevent moisture buildup and reduce the likelihood of mold or mildew.
In addition to ongoing care, the way the bathtub is used can impact its lifespan. Avoiding heavy objects that could crack or chip the surface is important. Keeping sharp objects away from the tub is essential as well. If any damage occurs, addressing it immediately can prevent further deterioration. By paying attention to both usage habits and regular maintenance, homeowners can enjoy their refinished tubs for an extended period, maximizing their investment and maintaining aesthetic appeal.
Maintaining Your Newly Finished Bathtub
To preserve the finish of your newly refinished bathtub, it’s essential to adopt proper cleaning methods. Use gentle, non-abrasive cleaners specifically designed for acrylic surfaces. Avoid harsh chemicals, scouring pads, or anything that may scratch the surface. Regular cleaning helps prevent the buildup of soap scum and grime, which can dull the shine of your bathtub over time.
In addition to using appropriate cleaning products, consider establishing a routine for maintenance. Wipe down the tub after each use to prevent water spots and mineral deposits. Ensure any spills or stains are addressed promptly to minimize long-term damage. Taking these steps will enhance the longevity of your bathtub and keep it looking fresh and new for years to come.
Care Tips for Lasting Results
To maintain the newly finished acrylic bathtub, regular cleaning with gentle, non-abrasive cleaners is essential. Avoid harsh chemicals and abrasive sponges that can damage the finish. A soft cloth or sponge alongside a mild soap solution will work effectively in keeping the surface clean without causing wear. Rinse thoroughly after cleaning to prevent soap scum build-up, which can dull the appearance over time.
Limiting the use of bath oils or gels can also help preserve the refinished surface. These products often contain ingredients that can lead to discoloration or degradation of the acrylic finish. Instead, opt for gentle formulas that are less likely to affect the surface. Additionally, avoid filling the tub with hot water immediately after refinishing since extreme heat can compromise the finish. Regular inspections for chips or scratches can help address small issues before they become larger problems.
- Regularly clean with gentle, non-abrasive cleaners to protect the finish.
- Use a soft cloth or sponge with a mild soap solution for effective cleaning.
- Rinse thoroughly after cleaning to avoid soap scum build-up.
- Limit the use of bath oils or gels, as they can lead to discoloration.
- Opt for gentle formulas that are safe for acrylic surfaces.
- Avoid extreme heat by not filling the tub with hot water immediately after refinishing.
- Conduct regular inspections for chips or scratches to maintain the tub’s appearance.
Common Mistakes to Avoid
One prevalent mistake during the refinishing process is inadequate surface preparation. Skipping thorough cleaning and sanding can lead to poor adhesion of the new finish, resulting in chipping or peeling. Be sure to remove any old coatings, soap scum, and mineral deposits before beginning the refinishing work. This essential step ensures that your new layer has a smooth surface to adhere to, increasing durability and longevity.
Another common pitfall is overlooking the importance of proper ventilation. Fumes from refinishing products can be hazardous, making it critical to work in a well-ventilated area. Poor ventilation not only poses health risks but can also affect the drying process. Ensure that windows are open and fans are running to facilitate air circulation, as this helps the materials cure properly and keeps the workspace safe.
Pitfalls That Can Ruin the Project
One major pitfall during the refinishing process is failing to properly prepare the surface. Any dirt, grime, or soap scum can interfere with paint adhesion. Even the smallest speck of residue can create imperfections in the finish. It is crucial to thoroughly clean the bathtub with a suitable cleaner and sand the surface to create a rough texture that allows the new coating to bond effectively.
Another common mistake involves not following the manufacturer’s instructions for mixing and applying the refinishing products. Incorrect ratios of hardener and paint can lead to a finish that doesn’t set correctly. This can result in bubbling, peeling, or uneven surfaces, significantly affecting the overall appearance and durability of the refinished bathtub. Always pay attention to the recommended drying times and environmental conditions to ensure the best results.
When to Call a Professional
Refinishing an acrylic bathtub can seem straightforward. However, complex issues may arise that warrant the expertise of a professional. Persistent stains, substantial cracks, or deep scratches often signal a need for specialized skills. If the bathtub has significant damage or requires extensive surface preparation, entrusting the work to a professional can ensure a durable and flawless finish.
Additionally, safety concerns regarding chemical exposure may be another reason to consider professional help. High-quality refinishing products often contain strong solvents that demand careful handling. If you’re uncomfortable with these materials or lack proper ventilation, employing a skilled technician might be the best choice. A professional not only adheres to safety standards but can also provide a warranty, adding long-term value to your investment.
Signs You Might Need Expert Help
When attempting a DIY bathtub refinishing project, there are certain signs that may indicate the need for professional assistance. If you notice extensive damage, such as deep cracks or significant surface irregularities, it may be challenging to achieve a smooth finish on your own. Additionally, if the refinishing process feels overwhelming or the materials seem complicated, seeking expert help can save you time and frustration.
Another red flag is the presence of mold or mildew that has penetrated the surface of the bathtub. These issues can require specialized treatment beyond standard refinishing techniques. If you encounter persistent problems during the refinishing process, it may be more efficient and effective to hire a professional who can ensure the job is done correctly and lastingly.
Cost Comparison
When considering bathtub refinishing, costs can vary significantly between DIY and professional options. A DIY project often involves the purchase of materials like epoxy paint, primer, and sealants. While you can save on labor fees, these expenses can accumulate, and there’s a risk of mistakes leading to additional costs such as redoing the project.
On the other hand, hiring a professional typically entails a higher upfront investment. However, it often includes quality assurances, expertise in the application process, and access to specialized tools and materials. Weighing the potential costs and benefits of each approach helps in making an informed decision that fits both your budget and desired level of finish.
Analyzing the Financial Impact
Undertaking an acrylic bathtub refinishing project yourself can lead to significant savings compared to hiring a professional. The cost of materials needed for a DIY approach typically includes refinishing kits, paint, and safety equipment. While initial expenditures may seem steep, these costs often pale in comparison to professional service fees. Most contractors charge anywhere from several hundred to over a thousand dollars, depending on the complexity of the job and the condition of the bathtub.
However, it’s essential to consider the potential pitfalls of a DIY project, which could lead to additional costs if mistakes occur. Improper application can result in a finish that peels or chips, requiring further refinishing or repairs. Alternatively, investing in professional services guarantees a high-quality finish that can extend the life of your bathtub, making it a potentially wiser financial choice in the long run. Analyzing both approaches helps homeowners understand not only the immediate costs but also the long-term value of their decision.
Conclusion
Refinishing an acrylic bathtub can be a rewarding project, offering an affordable way to refresh your bathroom without the hassle of a complete remodel. By following the proper techniques and taking the time to prepare and apply your selected materials, you can achieve a high-quality finish that looks brand new.
Routine maintenance will help ensure that your refinished tub remains in excellent condition for years to come. By being aware of common mistakes and knowing when to seek professional assistance, you can avoid costly setbacks and enjoy a stunning bathing space that enhances both functionality and aesthetic appeal.
FAQS
How long does the acrylic bathtub refinishing process take?
The entire refinishing process can take anywhere from a few hours to a couple of days, depending on drying and curing times, as well as any additional repairs needed.
Can I use my acrylic bathtub right after refinishing?
It is recommended to wait at least 24 to 48 hours before using the bathtub to ensure the finish has properly cured and adheres well.
What materials do I need for refinishing my acrylic bathtub?
You will need an acrylic refinishing kit, a paint roller, brushes, sandpaper, cleaning supplies, and protective gear such as gloves and a mask.
How do I ensure an even finish when painting the bathtub surface?
To achieve an even finish, use proper mixing techniques, apply smooth, even strokes, and avoid overloading your brush or roller with paint.
What are some common mistakes to avoid during the refinishing process?
Common mistakes include not properly preparing the surface, rushing the drying times, and applying too thick of a coat of paint, which can lead to an uneven finish.