Table of Contents
ToggleKey Takeaways
- Addressing Marks and Imperfections
- Achieving an Even Surface
- Cleaning Steps After Sanding
- Restoring Your Sanded Bathtub
- Care Advice for Sanded Bathtubs
- Frequent Errors to Steer Clear Of
- Looking for Expert Assistance
When to Use Electric Sander and Safety Measures
For most bathtub refinishing projects, an electric sander is a powerful tool to consider. It can save both time and effort, especially when dealing with larger surfaces or stubborn stains. However, it’s essential to assess the condition of the bathtub first. If the surface has minor blemishes, hand sanding might be adequate and less risky. Electric sanders are best suited for extensive repairs or when removing a deep layer of material.
Safety measures should always be a priority when using any power tools. Wearing protective gear such as goggles and a mask can prevent dust inhalation and protect your eyes from debris. Ensure the work area is well-ventilated to reduce exposure to harmful particles. Secure the bathtub area to keep it stable, and prioritize keeping electrical cords away from water to avoid accidents.
Dealing with Stains and Blemishes
Stains and blemishes on a bathtub can detract from its overall appearance, making it essential to address these imperfections effectively. Begin by identifying the type of stain you are dealing with, such as rust, hard water deposits, or soap scum. Each type requires specific treatment methods. For example, rust stains may respond well to a mixture of baking soda and vinegar, while soap scum can often be tackled with a combination of warm water and dish soap.
Once you have prepared your cleaning solution, apply it to the affected area using a soft cloth or sponge. Allow the solution to sit for several minutes to break down the stain, then gently scrub the surface in circular motions. Rinse with warm water afterward to remove any residue. Persistent stains might need repeat applications or more aggressive methods, such as commercial stain removers. Exercise caution when using stronger chemicals to prevent damage to the tub material.
Techniques for Removing Tough Spots
Tough spots on a bathtub can range from hard water stains to soap scum buildup. Begin by targeting these areas with a specialized cleaning solution. Apply the product and allow it to penetrate for several minutes. This treatment helps to soften the grime, making it easier to remove. Use a non-abrasive sponge or cloth to gently scrub the surface, focusing on the problematic areas. Rinse thoroughly with warm water to ensure all cleaning agents are washed away.
If stubborn stains remain, consider using a more aggressive approach, such as baking soda paste. Combine baking soda with a small amount of water to create a thick paste. Apply this mixture directly to the tough spots and let it sit for about 10-15 minutes. The natural abrasive nature of baking soda can lift built-up stains without damaging the bathtub’s surface. Afterward, scrub the area with a soft brush or cloth, then rinse well to reveal a cleaner, brighter finish.
Ensuring a Smooth Finish
Achieving a smooth finish on your bathtub after sanding requires attention to detail and the right techniques. Start by using fine-grit sandpaper, ideally between 220 and 400 grit, to refine the surface. This stage is crucial for eliminating any rough patches while ensuring that the tub remains free of deep scratches. Sand in a consistent direction and apply even pressure to avoid uneven surfaces.
Once the sanding is complete, it’s essential to clean the tub thoroughly to remove all dust and debris. Use a damp cloth to wipe down the entire surface. A gentle cleaner can help dissolve any remnants that might interfere with the final finish. After the cleaning is done, allow the surface to dry completely before moving on to the refinishing stage, ensuring that your smooth finish adheres properly.
Tips for Achieving a Flawless Surface
Achieving a flawless surface when sanding your bathtub requires attention to detail and the right techniques. Start by using the appropriate grit sandpaper for the initial pass; lower grits like 80 or 120 are effective for removing deeper scratches or imperfections. Follow up with finer grits, such as 220, to smooth the surface gradually. Consistent pressure and even strokes help maintain an even finish. It is also essential to sand in a circular motion to avoid creating flat spots that can be visible after refinishing.
Cleaning the area thoroughly between sanding passes is crucial for obtaining a smooth surface. Dust and debris left behind can act as imperfections in your final coat. Use a vacuum or damp cloth to clear away particles before continuing. Additionally, consider the environment in which you’re sanding. Adequate lighting allows you to see any uneven areas or blemishes during the process. Proper ventilation will ensure you can work without discomfort from dust and fumes. These steps will significantly enhance the overall quality of your refinishing project.
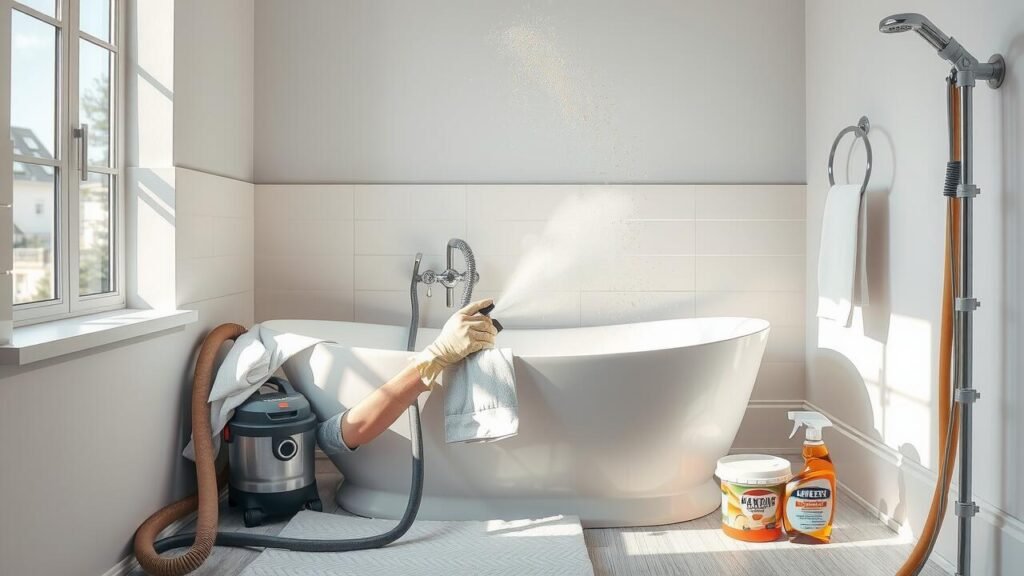
Post-Sanding Cleaning Procedures
After sanding your bathtub, removing all dust and debris is crucial to prepare for refinishing. Begin the cleaning process by using a vacuum cleaner with a brush attachment. This will effectively collect fine particles that may have settled in crevices. Follow up with a damp microfiber cloth to wipe down surfaces, ensuring no residue remains. It’s essential to use a gentle cleaner that won’t damage the tub’s surface; vinegar or a mild dish soap mixed with water works well for this.
Once you’ve thoroughly cleaned the bathtub, allow it to dry completely before applying any new coatings or finishes. Inspect the surface for any missed spots or imperfections; a second round of sanding may be needed if necessary. It’s important to ensure that the bathtub is completely free of moisture and contaminants before moving forward. This step is vital for achieving the best possible finish during the refinishing process.
How to Properly Clean Your Bathtub After Sanding
After sanding, it’s essential to remove dust and debris to prepare the surface for refinishing. Start by thoroughly rinsing the bathtub with warm water. Use a soft sponge or cloth to wipe down the entire surface, ensuring that all loose particles are eliminated. Pay special attention to corners and crevices where dust may accumulate. Rinse the sponge frequently and change the water as needed to maintain cleanliness throughout the process.
Once the majority of the dust is removed, a mild detergent can be applied to the surface. This will help eliminate any remaining residue from the sanding process. After scrubbing gently, rinse the bathtub again with clean water. It’s crucial to ensure that no soap or detergent remains, as this can interfere with the adhesion of any new coatings. Dry the bathtub thoroughly with a lint-free cloth to prevent water spots before moving on to refinishing.
Refinishing Your Sanded Bathtub
Once the sanding process is complete, it’s time to focus on applying a new coat to restore your bathtub’s finish. Start by ensuring the surface is thoroughly clean and free from any dust or debris that may affect adhesion. Choosing the right type of refinishing material is crucial, whether it’s a spray-on epoxy or a brush-on polyurethane. Carefully follow the manufacturer’s instructions regarding application methods and drying times. Applying multiple thin coats rather than one thick coat often yields a more even finish.
After your final coat is in place, give it adequate time to cure fully before using the bathtub. Depending on the product you choose, this can take anywhere from several hours to a few days. During this curing period, avoid any contact with water to ensure the new finish bonds properly. Once cured, your refinished bathtub should not only look visually appealing but also offer protection against stains and wear, enhancing the longevity of your investment in bath refinishing.
Steps for Applying a New Coat
After ensuring that your bathtub is perfectly sanded and clean, gather all necessary materials for applying a new coat of finish. Begin by selecting the appropriate paint or epoxy specifically designed for bathtubs. Read the manufacturer’s instructions carefully to determine the best application techniques and drying times. It’s advisable to work in a well-ventilated area to reduce fumes and maintain safety. Using a high-quality brush or roller will help achieve an even application. Start from one end of the tub, applying the coating in smooth, even strokes to avoid drips or uneven patches.
Allow the first coat to dry completely before assessing if a second coat is necessary. In many cases, two to three coats provide the best results, ensuring durability and a polished appearance. Lightly sand the surface between coats using fine-grit sandpaper to enhance adhesion. Once the final coat is applied, refrain from using the bathtub for at least 24 to 48 hours, depending on the product used. This waiting period allows the finish to cure fully, resulting in a longer-lasting and attractive surface.
| Material | Purpose | Tips |
|---|---|---|
| Bathtub Paint/Epoxy | Coating to finish the tub | Choose a product designed for tubs for durability |
| High-Quality Brush/Roller | Application tool | Use smooth, even strokes to avoid drips |
| Fine-Grit Sandpaper | Surface preparation between coats | Lightly sand to enhance adhesion |
| Drop Cloths | Protect surrounding areas | Cover floors and fixtures to prevent spills |
| Ventilation Fan | Air quality maintenance | Keep the area well-ventilated to reduce fumes |
Maintenance Tips for Sanded Bathtubs
Regular maintenance is essential to preserving the appearance and functionality of a sanded bathtub. Begin by using a gentle cleanser specifically formulated for bathtubs. Avoid harsh chemicals that can degrade the new finish. A soft sponge or cloth prevents scratches while effectively cleaning the surface. Rinsing well after cleaning helps remove any residue that could dull the finish over time.
To further maintain the integrity of the surface, consider applying a protective sealant every few months. This additional layer helps resist moisture and minimizes the risk of stains or blemishes. It is also important to avoid using abrasive tools or cleaners in your routine maintenance. Adopting a gentle approach will prolong the life of your refinished bathtub and keep it looking fresh and inviting.
Keeping Your Bathtub in Excellent Condition
Regular maintenance is key to preserving the aesthetic and functional qualities of your bathtub. Start by wiping down the surface after each use to prevent soap scum and mineral buildup. Use non-abrasive cleaners specifically designed for your bathtub’s material, whether it’s acrylic, fiberglass, or porcelain. Gentle scrubbing with a soft cloth or sponge will help maintain the shine without scratching the surface.
In addition to routine cleaning, periodically inspect your bathtub for signs of wear and tear. Look for any cracks, leaks, or discoloration. Addressing these issues early can prevent more extensive damage down the line. It’s also a good idea to avoid harsh chemicals or abrasive tools during cleaning. This practice helps in preserving the finish and extending the life of your bathtub significantly.
Common Mistakes to Avoid While Sanding
One frequent error during the sanding process is using the wrong grit sandpaper. Starting with a grit that is too coarse can leave deep scratches on the surface, making refinishing difficult. Conversely, using too fine a grit initially might not adequately remove imperfections or rough spots. It is crucial to begin with a suitable grit based on the bathtub’s condition and to gradually progress to finer grits for a polished finish.
Another common mistake is neglecting the importance of proper airflow and ventilation. Sanding generates dust and particles that can be harmful to breathe in. Failing to use a mask or neglecting to ventilate the area can lead to discomfort and health risks. Ensuring good airflow not only protects your health but also assists in achieving a cleaner work environment where you can see the results of your efforts more clearly.
Helpful Tips for a Successful Project
Preparation plays a crucial role in achieving a successful sanding project. Before starting, ensure that you gather all necessary tools and materials, including sandpaper of different grits, a vacuum cleaner, and protective gear like goggles and a mask. Clear the area around the bathtub to avoid accidents and limit distractions. When you begin sanding, work in a well-ventilated space to minimize dust inhalation. Maintaining steady pressure while sanding will prevent uneven surfaces and potential damage to the acrylic or fiberglass.
After sanding, it’s important to clean the surface thoroughly before proceeding with any refinishing. Dust and debris can interfere with the adhesion of new coatings. Use a vacuum to remove residual dust, followed by a damp cloth to wipe down the area. Let it dry completely before applying any primer or paint. This careful cleaning step can make a significant difference in the durability of the refinished surface. Keeping a tidy workspace and following these guidelines will contribute greatly to the overall quality of the project.
Seeking Professional Help
When considering the intricacies of refinishing a bathtub, the option of hiring a professional can alleviate the burden of achieving a perfect finish. Experienced contractors bring specialized tools and techniques that can ensure a smoother process, as well as a high-quality result. For those unsure about their skills or the proper sanding methods, professional assistance can provide peace of mind and reduce the likelihood of costly errors.
It may be especially beneficial to seek expert help if the bathtub has extensive damage or if the homeowner lacks the time or physical ability to undertake the project. Professionals are equipped to address specific challenges that might arise during the sanding and refinishing process. Their knowledge extends to the best materials and products to use, giving a homeowner confidence in the longevity and durability of the refinished surface.
When to Consider Hiring a Professional
Sanding a bathtub can be a straightforward DIY project, but certain scenarios call for professional assistance. If the damage is extensive, such as deep scratches or large stains that seem resistant to standard cleaning techniques, enlisting an expert can ensure a thorough repair. Additionally, if you are uncomfortable using power tools or lack experience with refinishing jobs, a contractor can provide both the skills and safety measures necessary to achieve the desired results.
Hiring a professional can also be beneficial if you wish to upgrade the surface material or choose a finish that requires special application techniques. Experts have access to high-quality products and tools, which can lead to a more durable and aesthetically pleasing finish. Furthermore, those with limited time may find it more efficient to let a professional handle the job, allowing for a quicker turnaround and less stress.
- If the bathtub has structural damage or underlying issues like leaks or mold.
- When you need to ensure compliance with local regulations or building codes.
- If you desire a specific aesthetic that requires advanced techniques or specialized materials.
- When you have limited experience with home improvement projects.
- If safety is a concern due to the use of harsh chemicals or power tools.
- When the project timeline is tight and you need a quicker resolution.
- If you want to ensure a warranty or guarantee on the work performed.
Conclusion
Sanding your bathtub is an effective way to revive its appearance and extend its lifespan. By following the correct techniques and safety measures, you can achieve a smooth, even finish that enhances your bathroom’s aesthetics.
Proper aftercare is essential after sanding. Regular maintenance will keep your bathtub looking pristine while preventing issues like stains and wear. When in doubt, consider professional help for the best results.
FAQS
When is it appropriate to use an electric sander on my bathtub?
An electric sander is best used for larger areas and tougher surfaces where manual sanding would be time-consuming. Ensure you take safety measures, such as wearing protective gear and ensuring proper ventilation.
How can I effectively deal with stains and blemishes on my bathtub?
Start by identifying the type of stain or blemish. For mild stains, a gentle abrasive cleaner may suffice, while tougher spots might require sanding. Always test a small, inconspicuous area first.
What techniques can I use to remove tough spots from my bathtub?
Techniques include using a combination of sanding and cleaning agents. Start with a finer grit sandpaper and gradually increase coarseness as needed. For persistent stains, consider using a dedicated stain remover.
How do I ensure a smooth finish after sanding my bathtub?
To achieve a smooth finish, use progressively finer grit sandpaper, and ensure you sand evenly. Follow up with a thorough cleaning to remove any dust or residue before applying a new coating.
What should I do to clean my bathtub properly after sanding?
After sanding, rinse the bathtub thoroughly to remove dust. Use a mild detergent and a soft cloth to clean the surface, ensuring you eliminate any sanding residue before refinishing.
What are the steps for applying a new coat after sanding?
First, ensure the surface is clean and dry. Apply a primer if necessary, followed by your chosen refinishing product. Use a brush or spray for an even application, and allow adequate drying time between coats.
How can I maintain my sanded bathtub to keep it in excellent condition?
Regular cleaning with non-abrasive cleaners, avoiding harsh chemicals, and promptly addressing any new stains or scratches will help maintain your bathtub’s finish and prolong its life.
What common mistakes should I avoid while sanding my bathtub?
Common mistakes include using excessively coarse sandpaper, not sanding evenly, failing to wear protective gear, and neglecting to clean the surface properly after sanding.
When should I consider hiring a professional for bathtub sanding?
If you’re unsure about the process, lack the necessary tools, or are dealing with significant damage that requires expertise, it may be best to hire a professional to ensure the job is done correctly.
What is the best way to ensure a flawless surface on my bathtub after sanding?
Achieving a flawless surface requires careful attention to detail. Use the right grit sandpaper, sand uniformly, clean thoroughly, and apply a high-quality finish for the best results.