Table of Contents
ToggleKey Takeaways
- Steering clear of frequent errors
- Importance of drying duration and perseverance
- Incorporating hues and enhancements
- Caring for your epoxy surface
- Fixing harmed epoxy
- Safety measures to consider
- Concluding details for a polished look
When to Choose Each Tool
When working with epoxy coating, selecting the right tools can greatly influence the quality of your finish. For larger surfaces, a roller is recommended for even application, allowing you to cover more area in less time. Smaller projects or detailed work benefit from brushes, which offer precision and control in hard-to-reach spots. Consider using a combination of both, as this approach can enhance overall efficiency and finish.
Additionally, specialty tools such as squeegees may come in handy for specific tasks, such as spreading a thicker layer or achieving a level surface. Airless paint sprayers are also an option for those comfortable with advanced techniques, providing a spray finish that can minimize brush marks. Assess the requirements of your project and match them to the capabilities of each tool to ensure the best results.
Avoiding Common Mistakes
One critical mistake many users make involves not adequately preparing the surface before applying the epoxy. Dirt, dust, or any form of contamination can create irregularities in the finish, leading to unattractive results. Properly cleaning and sanding the surface ensures better adhesion and a smoother outcome. Applying tape around edges can also prevent drips and unsightly lines.
Another common issue occurs when the temperature and humidity levels are not taken into consideration. Epoxy resins have specific requirements for optimal curing conditions. High humidity can cause cloudiness, while low temperatures can lead to a sluggish curing process. It is essential to monitor the environment before and during application to achieve the best results.
Pitfalls to Watch Out For
One common pitfall during the epoxy coating process is neglecting surface preparation. Dust, dirt, or moisture on the surface can lead to adhesion problems and a finish that doesn’t cure properly. Ensuring a clean, dry, and properly prepared substrate is crucial for achieving optimal results. Skipping this step may result in peeling or bubbling once the coating is applied.
Another issue arises from inconsistent mixing of the epoxy components. Inaccurate ratios can lead to a finish that either hardens too quickly or remains tacky. It is essential to follow the manufacturer’s instructions meticulously when combining the resin and hardener. Not doing so can adversely affect the durability and appearance of the final product.
Curing Time and Patience
The curing process for epoxy resin is crucial to achieving a durable and glossy finish. Typically, the resin will have a specific pot life and curing time as indicated by the manufacturer. Pot life refers to the period during which the resin remains workable after mixing, while curing time is the duration required for the resin to fully harden. It is essential to follow these time parameters closely to avoid a compromised finish. Rushing this process can result in soft spots or uneven surfaces, so patience plays a significant role in successful application.
Temperature and humidity can also influence curing times. Higher temperatures often expedite the curing process, while cooler environments may extend it. Monitoring these conditions is important, especially if you are working in an environment that is not climate-controlled. Allowing adequate time for the epoxy to cure will enhance the performance and longevity of your finish. Keeping these factors in mind will contribute to a more successful outcome and a smoother, more professional appearance.
Understanding the Curing Process
The curing process for epoxy is a critical phase that determines the quality and durability of the final finish. This process involves the chemical reaction between the resin and hardener, resulting in a strong and resilient surface. As the epoxy undergoes curing, it transitions from a viscous liquid to a solid state. This transformation requires careful monitoring of environmental conditions such as temperature and humidity, as they can significantly impact the curing time and overall outcome.
Proper understanding of the curing timeline is essential for achieving optimal results. Typically, the initial set can occur within a few hours, but full curing may take several days. Most manufacturers provide specific guidelines on the curing stages, which are crucial for planning the application and ensuring the surface remains undisturbed during this critical period. Rushing the process can lead to bubbles, tackiness, or incomplete hardening, ultimately compromising the integrity of the coating.
Adding Color and Effects
Incorporating color and effects into your epoxy coating can elevate its aesthetic appeal and tailor it to your specific design needs. Various options are available, such as pigment powders, metallic dyes, and glitter. When adding pigments, ensure they are compatible with the epoxy resin you’re using. A well-measured ratio will help achieve a consistent color throughout the mixture, preventing any unwanted variations.
Creating unique designs can be accomplished through techniques like marbling and layering. These methods allow for distinctive patterns and effects that can enhance the visual depth of the surface. Experimenting with different application tools, such as brushes or sponges, can also yield interesting results. Always conduct a test on a small area before fully committing to ensure the desired effect meets your expectations.
How to Customize Your Epoxy Finish
Customizing an epoxy finish allows for personal expression and creativity. One popular method is to add color pigments or dyes to the epoxy mixture. This can create stunning monolithic surfaces that enhance the overall aesthetics. In addition to solid colors, glitters or metallic powders can be included for added depth and shimmer. Layering different colors can also achieve unique effects, such as swirls or marbling, providing a dynamic look.
Incorporating other materials can further elevate the custom finish. Embedding objects like seashells, stones, or even photographs can create a one-of-a-kind surface. It’s essential to ensure these materials are compatible with the epoxy to avoid any reaction. Planning the design beforehand can help visualize the final result and ensure a cohesive look. Taking the time to experiment with different techniques and materials leads to a personalized finish that stands out.
Maintaining Your Epoxy Coating
Regular maintenance is crucial for preserving the appearance and durability of an epoxy coating. Begin by keeping the surface clean. Use a soft mop or cloth and a gentle cleaning solution to remove dust, dirt, and stains. Avoid harsher cleaners, as they may scratch or degrade the finish over time. If spills occur, address them promptly to prevent damage.
It is also essential to inspect the coating periodically for any signs of wear or damage. Look for scratches, chips, or areas where the epoxy may be peeling. Prompt repairs can help maintain the integrity of the surface and prolong its lifespan. For minor imperfections, a light sanding and a reapplication of a thin epoxy layer can restore the original finish. Ensure you follow the manufacturer’s recommendations for repair products and techniques to achieve the best results.
Tips for Longevity and Care
To ensure your epoxy coating remains in top condition, regular maintenance plays a crucial role. Start by sweeping away dust and debris to prevent scratches and dullness. A damp mop with a gentle cleaner can be used for deeper cleaning. Avoid harsh chemicals as they can degrade the epoxy over time. For high-traffic areas, consider applying a fresh layer of epoxy every few years to maintain that glossy finish and protect against wear and tear.
It’s wise to perform periodic inspections for any signs of damage or wear on your epoxy surface. Look out for chips or cracks, and address them promptly to prevent further deterioration. Using coasters and mats under heavy furniture can also help minimize scratches. Keeping sharp objects away from the surface reduces the risk of accidental cuts. By taking these simple measures, you can significantly extend the lifespan of your epoxy coating.
Repairing Damaged Epoxy
Damage to epoxy surfaces can occur due to everyday wear and tear, impacts, or improper curing. Identifying the extent of the damage is crucial before starting the repair process. Surface cracks or chips may require simple sanding and filling, while deeper damages could need more substantial repair methods. Cleaning the area thoroughly helps to ensure that any contaminants do not interfere with the bond of the new epoxy.
Once the damaged area is prepared, applying a new layer of epoxy is often necessary. Mix the epoxy according to the manufacturer’s instructions to achieve the right consistency. Pour the mixed epoxy over the damaged area, ensuring even coverage. Utilizing a spreader can help in achieving a smooth surface. After application, allow the repair to cure fully, which may take several hours to days depending on the specific product and environmental conditions. Regular maintenance and timely repairs can significantly extend the life of your epoxy finish.
Steps for Refurbishing Your Surface
Start by assessing the damaged area to determine the extent of the repairs needed. Clear away any debris or loose epoxy with a scraper. Sand the surface gently to create a rough texture, allowing the new epoxy to adhere better. If the damage is deep, filling it with an epoxy filler can help achieve a smooth surface. After applying the filler, sand it down until it’s level with the surrounding area.
Once you have prepared the surface, clean it thoroughly with a suitable cleaner to eliminate any dust or residue. Allow the surface to dry completely before applying a new layer of epoxy. Mix the epoxy according to the manufacturer’s instructions, making sure to achieve the proper consistency. Apply it smoothly over the repaired area. For the best results, use a roller or brush, ensuring an even coat that matches the surrounding finish.
| Step | Description | Tools Needed |
|---|---|---|
| 1. Assess Damage | Evaluate the extent of the repairs required. | None |
| 2. Clear Debris | Remove any debris or loose epoxy with a scraper. | Scraper |
| 3. Sand Surface | Gently sand the area to create a rough texture. | Sanding Paper or Sander |
| 4. Fill Deep Damage | Apply epoxy filler if necessary and level the surface. | Epoxy Filler, Putty Knife |
| 5. Apply New Epoxy | Mix and apply a new layer of epoxy smoothly over the repaired area. | Epoxy, Roller or Brush |
Safety Precautions
When working with epoxy coatings, it is crucial to prioritize safety to avoid potential hazards during application. Wearing appropriate personal protective equipment, such as gloves, goggles, and masks, can help prevent skin, eye, and respiratory irritation. It is advisable to work in a well-ventilated area or utilize a respirator designed for chemical fumes to minimize inhalation of harmful vapors.
The workspace should also be cleared of unnecessary items and free from any flammable materials. This reduces the risk of accidents and ensures that you remain focused on the task. Always read and follow the manufacturer’s safety data sheets (SDS) for specific information regarding handling and emergency measures. Taking these precautions not only protects your health but also contributes to a more efficient and smooth epoxy application process.
Protecting Yourself During Application
When working with epoxy coatings, safety should be a top priority. Always wear appropriate personal protective equipment (PPE) which includes gloves, goggles, and a mask designed for fume protection. Epoxy can release harmful fumes during the application process, making proper ventilation essential. Ensure your workspace is well-ventilated. Open windows and doors or use fans to promote airflow. This not only reduces exposure to potentially harmful chemicals but also ensures a more comfortable environment while you work.
It’s also crucial to be mindful of your clothing and equipment. Wear long sleeves and pants to minimize skin exposure. Consider using a disposable overall if available. Be cautious of spills and splashes; they can create hazardous situations. Keep the workspace organized and free from clutter, which can prevent accidents. Always have a plan for immediate clean-up for any accidental spills to ensure your safety and the integrity of your project.
Final Touches
A smooth and appealing epoxy finish doesn’t just happen; it requires careful attention to detail during the final stages of the project. After the coating has cured, inspecting the surface for any imperfections is crucial. Any dust, bubbles, or uneven areas should be addressed to achieve a professional look. Light sanding with fine-grit sandpaper can help eliminate minor flaws, and a final wipe-down ensures the surface is clean and ready for the last layer.
Adding a finishing touch can enhance the overall aesthetic of the epoxy surface. Consider applying a protective top coat, especially if the area will see heavy foot traffic or outdoor exposure. This additional layer not only boosts durability but can also add a beautiful sheen that elevates the visual appeal. For custom designs, incorporating decorative flakes or metallic pigments can make the finish stand out even more, creating a unique and personalized effect.
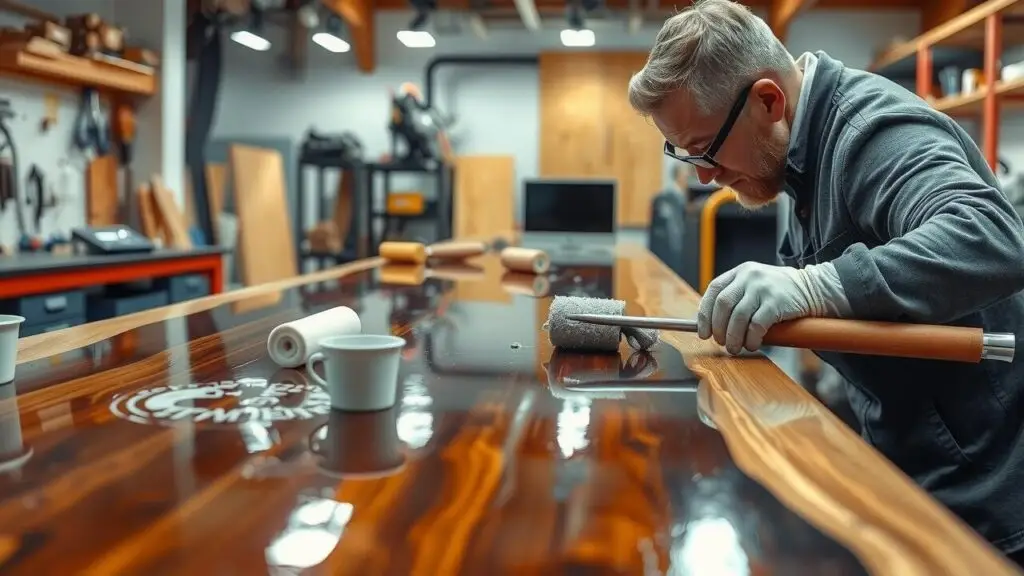
Ensuring a Professional-Looking Result
Achieving a professional-looking result with epoxy coating often hinges on the final touches applied before the product cures completely. Addressing imperfections as soon as they arise is crucial. Use a clean, lint-free cloth to wipe away any bubbles or debris that may have settled on the surface. A heat gun or torch can help remove stubborn bubbles, but care must be taken not to overheat the epoxy. Gentle stirring can also help reduce bubbles before application, ensuring a smooth finish that is aesthetically pleasing.
The environment plays a significant role in the curing process. Ensure you work in a dust-free area with controlled temperature and humidity levels to prevent contaminants from disrupting the surface. Additionally, using a high-quality roller or brush specifically designed for epoxy can enhance the finish. Blending multiple thin layers rather than one thick layer often yields superior results. Taking time to step back and inspect the surface can lead to significant improvements, allowing you to spot areas that may need additional attention before the epoxy sets.
- Ensure the workspace is well-ventilated to allow any fumes to dissipate.
- Use painter’s tape to protect edges and prevent unwanted drips.
- Mix the epoxy according to the manufacturer’s instructions for optimal results.
- Always wear protective gear, such as gloves and goggles, when working with epoxy.
- Plan the layout beforehand to avoid unnecessary overlap or waste of material.
- Maintain a consistent application speed to achieve an even finish.
- Check for any dust or hair on the surface after application and before curing.
Conclusion
Achieving a smooth finish with epoxy coating requires careful attention to detail throughout the entire application process. Selecting the right tools, understanding curing times, and implementing safety precautions all contribute to a successful outcome. Regular maintenance and knowing how to address potential damages ensure the longevity of your epoxy surfaces.
By incorporating color and personal effects, you can create a unique look tailored to your style. Taking the time to understand common pitfalls and following recommended practices will help you achieve a professional-looking result. With patience and diligence, your epoxy coating project can become a durable and aesthetic asset in your space.
FAQS
What tools are best for applying epoxy coating?
The best tools for applying epoxy coating include brushes, rollers, and squeegees. Each tool has its specific use depending on the surface and desired finish.
How long does epoxy take to cure?
Epoxy curing time can vary depending on the product and environmental conditions, but it typically takes 24 to 72 hours to fully cure. Always check the manufacturer’s instructions for exact times.
Can I add color or effects to my epoxy coating?
Yes, you can add various colorants or effects, such as glitter or metallic powders, to customize your epoxy finish. Make sure to mix them thoroughly for an even appearance.
What are some common mistakes to avoid when applying epoxy?
Common mistakes include not properly preparing the surface, mixing the epoxy incorrectly, and rushing the curing process. Following instructions carefully can help prevent these issues.
How can I repair a damaged epoxy coating?
To repair a damaged epoxy coating, start by cleaning the area, sanding it down to create a rough surface, and then applying a new layer of epoxy. Follow the manufacturer’s guidelines for the best results.