Table of Contents
ToggleKey Takeaways
- Building up layers for richness
- Care for tools and apparatus
- Resolving frequent problems
- Safety measures and guidelines
- Completing details and wrapping up
- Efficient cleaning methods after tasks
- Gaining insights from past projects
Tips for Controlling Spray Patterns
Achieving the desired spray pattern requires careful adjustments to your equipment settings. Begin by selecting the appropriate nozzle size for your project; finer nozzles produce narrower sprays, while larger nozzles allow for broader coverage. Experiment with the distance from the surface when spraying; too close may lead to drips, while too far can result in overspray. A steady, consistent motion across the surface is crucial, as jerky movements can create uneven patterns.
It’s also essential to maintain a consistent speed while moving the spray gun. Aim for an even overlap between passes to ensure complete coverage without gaps. Adjusting the air pressure settings on your spray gun influences the atomization of the paint, which impacts the finish quality. Keeping the gun at a 90-degree angle to the surface helps achieve an even application, minimizing the likelihood of streaks or blotches.
Layering for Depth
Achieving a sense of depth in spray painting often involves careful layering. Begin with a base coat that sets the foundation for your project. This initial layer should be a solid color that complements your overall design. Once the base layers have cured completely, additional colors can be introduced. Applying these layers in light, even coats will help to build dimension gradually.
Each subsequent layer can introduce variations in color or texture. Experiment with different techniques, such as blending or stenciling, to add interest. Always allow adequate drying time between layers to prevent smudging or lifting the paint underneath. Building up layers thoughtfully can create a rich effect that elevates the overall appearance of your work.
Understanding Drying Times
Understanding the drying times of spray paint is crucial for achieving a smooth, even finish. Various factors influence drying times, including temperature, humidity, and the type of spray paint used. Warmer temperatures and lower humidity levels tend to expedite drying, while cool, damp conditions can significantly prolong it. Manufacturers provide guidelines on drying times for their specific products, and it’s advisable to follow these recommendations closely.
It’s essential to give each layer adequate time to dry before applying another coat. Uneven drying can lead to smudges, runs, or an overall less polished appearance. Painting in well-ventilated areas promotes quicker drying and an even finish. When in doubt, conducting a touch test on a small, inconspicuous area can help gauge whether the paint is ready for additional layers.
Equipment Maintenance
Proper equipment maintenance is essential for achieving the best results in spray painting. Regularly check the spray gun for any clogs or blockages. Cleaning the nozzle after each use helps maintain a consistent spray pattern. Inspect hoses for leaks or wear and replace them if necessary. Ensure that all components, including the air compressor and paint containers, are clean and functioning correctly. This proactive approach not only enhances performance but also extends the life of your equipment.
Before starting a new project, it’s wise to perform a thorough equipment check. Make sure that the spray gun is fully assembled and that all parts are securely connected. A well-maintained setup allows for smoother operation and better control during painting. Adhering to a regular maintenance schedule reduces the chances of encountering problems mid-project. Investing time in care and upkeep ultimately leads to a more enjoyable and efficient spray painting experience.
Cleaning and Storing Spray Tools
Proper maintenance of spray tools is essential for achieving optimal results in your painting projects. After using your spray equipment, it is crucial to clean it thoroughly to prevent clogs and ensure longevity. Begin by disassembling the spray gun according to the manufacturer’s instructions. Use appropriate cleaning solutions to dissolve any leftover paint. Rinse all parts with clean water, ensuring that all residues are removed from the nozzle, cup, and air filter.
Once the tools have been cleaned, allow them to dry completely before storing. Proper storage requires keeping spray equipment in a cool, dry place away from direct sunlight. Store the tools in a protective case or bag to prevent dust accumulation. It’s also helpful to keep an inventory of your equipment and the cleaning supplies you use to simplify the maintenance process in the future. Regular care and organized storage can significantly extend the life of your spray tools.
| Tool | Cleaning Solution | Drying Method | Storage Location |
|---|---|---|---|
| Spray Gun | Water-based cleaner | Air dry | Cool, dry place |
| Paint Cup | Solvent-based cleaner | Pat with a cloth | Protective case |
| Air Filter | Compressed air | Air dry | Drawer or toolbox |
| Nozzle | Hot, soapy water | Air dry | Protective bag |
Troubleshooting Common Issues
Uneven coats can occur for various reasons during spray painting. One common cause is inconsistent distance from the surface. Keeping the nozzle too close may result in drips, while holding it too far can lead to a dry finish. Additionally, environmental factors like wind or humidity can affect how the paint settles on the surface. It is crucial to monitor these conditions and make necessary adjustments throughout the painting process.
Another issue may arise if the spray can or equipment is not functioning correctly. Clogs in the nozzle can create splatter patterns instead of a smooth spray. Regularly checking the equipment ensures optimal performance. If uneven coverage persists, consider testing on a scrap piece before moving to the final surface. This approach allows for adjustments without jeopardizing the main project.
Identifying and Fixing Uneven Coats
Uneven coats in spray painting can manifest as splotches, drips, or thin areas that disrupt the overall finish. To identify these issues, carefully inspect the painted surface in varying lighting conditions. Natural light is particularly revealing, as it highlights inconsistencies that may go unnoticed indoors. Run your fingers over the surface to feel for texture variations. If the paint feels rough or bumpy in certain areas, those are indicators of uneven application.
To address uneven coats, start by allowing the paint to dry completely before making any corrections. Once dry, sand down any bumps or drips with fine-grit sandpaper for a smoother finish. A light misting of paint can help fill in thin spots. Maintain a consistent distance from the surface when spraying to promote even coverage in future layers. If necessary, applying an additional coat after proper preparation can restore uniformity to the surface.
- Inspect the painted surface in multiple light settings for hidden flaws.
- Use fine-grit sandpaper to smooth out the surface before reapplying paint.
- Employ a light misting technique to blend in thin areas effectively.
- Keep a consistent distance from the surface during spraying to ensure even application.
- Apply additional coats as needed to achieve a uniform finish.
- Allow ample drying time between coats to avoid further imperfections.
- Clean the surface before painting to remove any dust or debris that can affect adhesion.
Safety Precautions
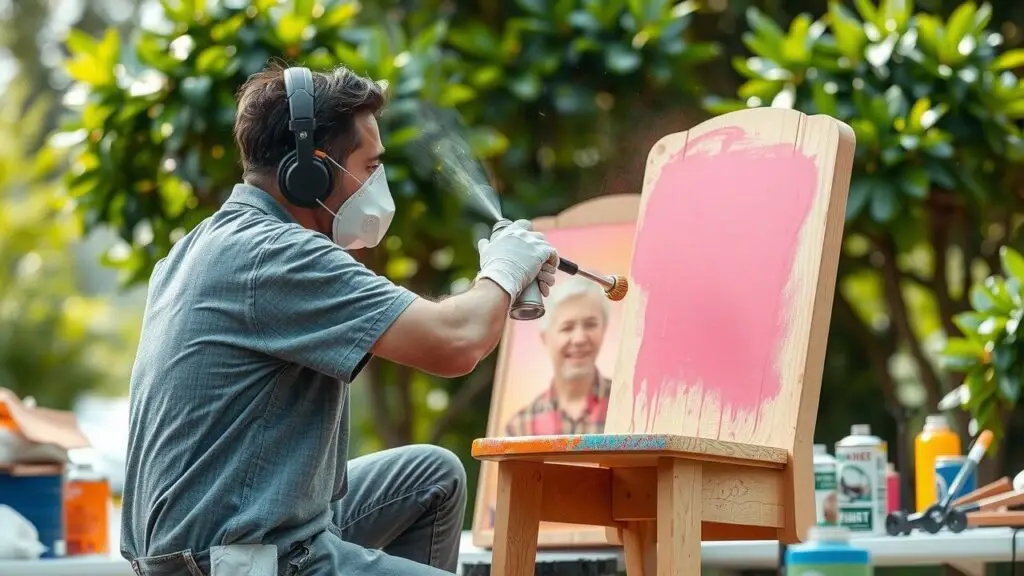
When engaging in spray painting, it’s crucial to prioritize safety to ensure a trouble-free experience. Begin by selecting a well-ventilated area or working outdoors. Poor ventilation can lead to the buildup of harmful fumes. Consider using a respirator mask designed for paint spraying to protect your lungs. Eye protection is equally important, as overspray and paint particles can lead to serious injuries. Wear protective goggles or glasses to keep your vision safe during the process.
In addition to respiratory and eye safety, using appropriate clothing can minimize skin exposure to paint. Choose long sleeves and pants made of durable fabric, and consider using gloves to avoid direct contact with chemicals. Ensure that any nearby flammable materials are removed from the workspace to reduce the risk of fire hazards. By taking these precautions seriously, you create a safer environment for both yourself and those around you during the spray painting process.
Protective Gear and Health Guidelines
When engaging in spray painting, it is essential to wear appropriate protective gear to safeguard your health. A high-quality respirator will filter out harmful fumes and particles, ensuring you breathe cleaner air while working. Goggles are vital for protecting your eyes from overspray and irritants. It’s also advisable to wear gloves to prevent skin contact with chemicals, which can cause irritation or allergic reactions.
Proper ventilation is crucial during the painting process. Working in a well-ventilated area helps disperse harmful vapors and reduces the risk of inhalation. If working indoors, consider using fans or opening windows to improve airflow. Overall, prioritizing your safety by equipping yourself with the right gear and ensuring a safe workspace will lead to a healthier painting experience.
Final Touches and Finishing Up
After completing the main spraying process, it’s important to step back and inspect the surface. Look for any inconsistencies in color or texture. This is the time to make any necessary touch-ups. Use a fine spray mist on areas that need corrections. Ensure that the paint isn’t too thick, as this can lead to drips that will require additional refinishing.
Final inspections can help identify spots that might have been missed initially. A good light source is essential for this task. If any imperfections are discovered, address them promptly using the same method as before, keeping in mind the need for even coverage. Once satisfied with the outcome, allow the paint to cure properly before applying any additional layers or finishes for optimal results.
Inspecting and Touching Up
After completing a spray painting project, it’s essential to conduct a thorough inspection of the surface. Look for any areas that may have been overlooked or where the coverage appears uneven. A good light source can help reveal imperfections. Pay attention to corners and edges, where paint can easily dribble or miss spots. Tiny blemishes, such as runs or drips, should also be noted for correction.
Once you identify areas needing attention, address them with touch-up paint. Use a spray can or airbrush for consistency with the surrounding finish. Applying light coats allows better blending with the existing layers. Always let each layer dry completely before assessing if further touch-ups are needed. Proper assessment and technique can significantly enhance the overall appearance of the project.
Effective Cleaning Techniques Post-Project
Cleaning your spray tools after a project is essential for maintaining their performance. Begin by clearing excess paint from the nozzle and paint cup. Use a recommended solvent or cleaner depending on the type of paint used, whether oil-based or water-based. For thorough cleaning, fill the container with the solvent and spray it until the spray pattern runs clear. This helps to prevent any dried paint from clogging the mechanism.
Once the tools are cleaned, disassemble any removable parts if applicable for a deeper cleanse. Soak these components in solvent while ensuring that the spray gun, hoses, and filters are free from residue. Rinse everything thoroughly with water if using water-based paint, or with a suitable solvent for oil-based varieties. After rinsing, dry all parts completely before reassembling and storing your tools properly to extend their lifespan.
Disposal of Unused Materials
Proper disposal of unused spray paint and other materials is essential to ensure environmental safety and compliance with local regulations. Check with local waste management authorities for specific guidelines on hazardous materials. Many communities offer special collection days for paint and chemicals, making it easier to dispose of items safely. If allowed, some stores may accept leftover paint for recycling purposes.
Unused materials should not be poured down drains or thrown in regular trash. Instead, if you have leftover spray paint, consider using it in smaller projects or community art initiatives. Seal the containers tightly and label them as appropriate to prevent accidental use. Always prioritize sustainability by exploring eco-friendly disposal or recycling options when available.
Learning from Experience
Every spray painting project offers valuable lessons that can enhance future endeavors. Taking the time to document specific techniques, challenges faced, and successful strategies can significantly improve one’s skills. Noting details such as color mixtures, patterns applied, and drying conditions helps establish a reference for future projects. Reflecting on what worked well and what did not allows painters to build a more effective approach over time.
Maintaining a spray painting journal can be a useful method for tracking progress and refining techniques. Recording insights after each project enables artists to develop a personalized workflow that suits their unique style and preferences. Over time, this journal becomes an essential tool, guiding decisions and sparking creative ideas for new projects. Embracing this practice helps ensure continued growth and improvement in spray painting skills.
Keeping a Spray Painting Journal
Maintaining a spray painting journal can significantly enhance your skills over time. Documenting each project provides a record of the materials used, techniques applied, and the outcomes achieved. This can be particularly beneficial when experimenting with different spray patterns or finishes. By reviewing your past entries, you can identify which strategies worked well and which didn’t, allowing for continuous improvement.
Including specific details in your journal enhances its usefulness. Note the types of paint, spray equipment settings, and environmental conditions during each project. Additionally, capturing your thoughts on the results will help you refine your approach. Regularly reflecting on this information will foster personal growth and establish a clearer understanding of your unique style in spray painting.
Conclusion
Achieving an even application in spray painting requires a combination of technique, proper equipment, and attention to detail. Practicing effective control over spray patterns, understanding drying times, and maintaining equipment can all significantly influence the quality of the finish. Taking the time to prepare adequately and follow established guidelines will lead to more satisfactory results.
Emphasizing safety precautions is essential throughout the process. Wearing appropriate protective gear not only safeguards your health but also promotes a better working environment. By addressing common issues proactively and learning from each project, you can refine your skills and enhance your spraying technique, ensuring consistently impressive outcomes.
FAQS
What are some tips for controlling spray patterns when painting?
To control spray patterns, maintain a consistent distance from the surface, use smooth, sweeping motions, and adjust the nozzle settings according to the desired pattern width.
How can I achieve depth in my spray painting layers?
Layering is key to achieving depth. Start with a base coat, allow it to dry, and then apply additional layers gradually, ensuring each layer is thin to avoid runs and drips.
Why is understanding drying times important in spray painting?
Understanding drying times helps you plan your project effectively. It ensures that each layer dries properly before applying the next, which prevents issues like uneven coverage and sticking.
What should I do to maintain my spray painting equipment?
Regular maintenance includes cleaning the spray gun after each use, checking for clogs in the nozzle, and storing equipment in a dry, dust-free environment to prolong its lifespan.
How can I identify and fix uneven coats in my spray painting project?
Uneven coats can often be identified by visual inspection. If found, you can fix them by lightly sanding the affected area and applying an additional layer of paint to achieve a smooth finish.