Table of Contents
ToggleKey Takeaways
- Addressing drying complications
- Tidying up post-refinishing
- Caring for your freshly coated tub
- Recognizing blemishes and fading
- Fixing nicks and abrasions
- Resolving scent concerns
- Knowing when to seek expert help
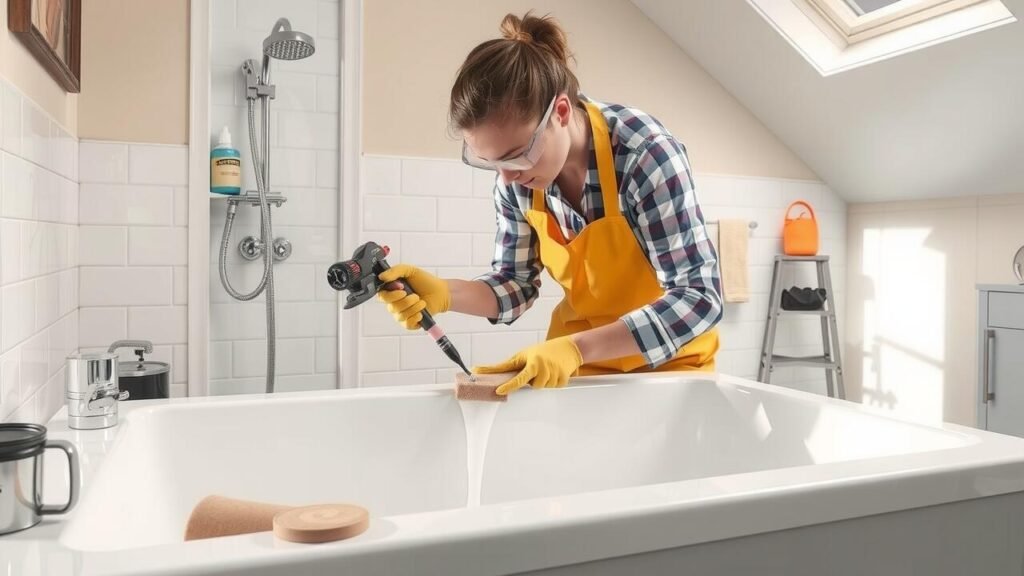
How to Avoid Bubbling and Drips
Proper surface preparation is crucial in preventing bubbling and drips during the refinishing process. Ensure the bathtub is thoroughly cleaned and free from soap scum, dirt, and grease. Any residual contaminants can disrupt the adhesion of the new finish, leading to unsightly bubbles. Filling in existing chips or cracks with an appropriate epoxy can also help create a smoother surface, minimizing the chances of imperfections.
Applying the refinishing product in thin, even coats is essential to achieving a professional finish. Using a high-quality spray gun can provide more control and uniform coverage compared to brushes or rollers. Maintain a consistent distance from the surface while spraying; this prevents excessive buildup in one area that can cause drips. Allow each coat to dry according to the manufacturer’s instructions before proceeding to additional layers, ensuring a durable and visually pleasing result.
| Preparation Step | Description | Importance |
|---|---|---|
| Clean Surface | Thoroughly clean the bathtub to remove soap scum, dirt, and grease. | Prevents adhesion issues that can cause bubbles. |
| Fill Chips/Cracks | Use an appropriate epoxy to fill any existing imperfections. | Creates a smoother surface for better finish adhesion. |
| Thin Coats | Apply the refinishing product in thin, even layers. | Helps achieve a professional, drip-free finish. |
| Use Spray Gun | Employ a high-quality spray gun for application. | Offers better control and uniform coverage than brushes or rollers. |
| Drying Time | Allow each coat to dry fully before adding more layers. | Ensures a durable and visually appealing result. |
Dealing with Curing Issues
Curing issues can significantly affect the integrity and appearance of your newly refinished bathtub. It’s essential to allow sufficient time for the coating to set properly, as inadequate curing can lead to a compromised finish that doesn’t adhere well to the surface. Factors such as humidity, temperature, and airflow in the area can have a profound impact on the curing process. A too-humid environment or low temperatures can extend the curing time beyond what is recommended by the manufacturer.
Identifying signs of incomplete curing early can prevent long-term damage. Look for areas that appear tacky or soft to the touch, as these may signal that the finish is not fully set. If you notice fingerprints or smudges despite following the instructions, it’s likely that the coating hasn’t cured properly. In such cases, avoiding water exposure until the finish is entirely hardened is crucial, as premature contact can cause peeling or bubbling.
Signs of Incomplete Curing
One of the most noticeable signs of incomplete curing is a tacky or sticky surface. When you touch the refinished bathtub, it should feel smooth and dry. A sticky feeling can indicate that the coating has not fully set, which may lead to further issues down the line, such as peeling or fading. If the surface feels soft to the touch even after the recommended curing time, it’s likely that the finish hasn’t cured properly.
Another indication is the presence of bubbles or blisters in the finish. These imperfections can arise when the coating was applied too thickly or if there was moisture trapped beneath the surface. Not only do they detract from the appearance of the bathtub, but they also compromise the durability of the finish. Checking for these signs shortly after the refinishing process can help you address any problems before they worsen.
Cleaning Up After Refinishing
The cleanup process is an essential step following the refinishing of your bathtub. Begin by removing any masking tape and drop cloths carefully. This will help prevent any accidental scratches or damage to the newly finished surface. Use a soft cloth to wipe down the area around the tub, removing dust and debris that may have accumulated during the project. After that, dispose of any leftover materials, paint cans, and used brushes in accordance with local regulations to ensure safety and environmental consideration.
Proper ventilation is crucial during the cleanup phase. Open windows and use fans to circulate fresh air if possible. If chemical odors persist, consider using an air purifier or ozone generator to eliminate unpleasant smells. Make sure to wash your hands thoroughly after handling any refinishing chemicals to minimize exposure. Taking time to clean up meticulously can help maintain the integrity and appearance of your newly refinished bathtub.
Safe Disposal of Chemicals and Waste
Proper disposal of chemicals and waste is crucial for environmental safety and public health. Many refinishing products contain hazardous substances that can harm ecosystems if not handled correctly. Always check local regulations and guidelines for disposing of hazardous materials. Many communities have designated collection sites or specified days for hazardous waste disposal, making it easier to manage leftover chemicals without negatively impacting the environment.
When disposing of containers, ensure they are completely empty and rinsed before recycling or throwing them away. Do not pour leftover chemicals down the drain or in regular trash, as this may lead to contamination and pose health risks. If unsure, seek assistance from your local waste management facility for information on safe disposal options specific to your area. Adopting these practices can help ensure that your refinishing project does not contribute to larger environmental issues.
- Always wear protective gear when handling hazardous materials.
- Store leftover chemicals in their original containers with labels intact.
- Participate in community hazardous waste collection events.
- Educate others about the importance of safe chemical disposal.
- Research safe disposal methods for specific types of chemicals.
- Report illegal dumping of hazardous materials to local authorities.
- Consider alternative products that are less harmful to the environment.
Maintaining Your Newly Finished Bathtub
A newly finished bathtub requires specific care to preserve its shiny appearance and durability. It’s recommended to wait at least 24 to 48 hours after refinishing before using the tub to allow the surface to set properly. Once the curing time has passed, regular cleaning can help maintain the finish. Use non-abrasive cleaning products to avoid scratching or damaging the surface. Soft cloths or sponges work best when wiping down the tub, ensuring that harsh scrubbing isn’t a concern.
Preventive measures are crucial for maintaining the bathtub’s condition over time. Avoid placing any heavy objects inside the tub, as this can lead to dents or scratches. If you notice any signs of wear, address them promptly to avoid further damage. Additionally, keeping the bathroom well-ventilated reduces moisture buildup that may lead to mold or mildew, both of which can affect the refinishing’s longevity. Regular inspections will help you catch any potential issues early, preserving the beauty and functionality of your bathtub.
Recommended Cleaning Products and Techniques
Maintaining the beauty of a refinished bathtub requires careful consideration of cleaning products. Opt for non-abrasive cleansers to prevent scratching the new surface. Look for pH-balanced, gentle formulas specifically designed for acrylic or enamel bathtubs. Avoid harsh chemicals like bleach and ammonia, as they can damage the finish over time. Microfiber cloths are great for wiping down surfaces without leaving lint or scratches, ensuring your tub retains its luster.
Alongside proper cleaning agents, there are effective techniques that can enhance the longevity of your bathtub’s finish. Regularly rinse the surface after each use to minimize soap buildup and prevent stains. For deeper cleans, consider using a soft sponge or soft-bristle brush to gently scrub away any grime. Establishing a routine that includes thorough cleaning once a week will keep your tub in pristine condition, making it both a functional and attractive feature in your bathroom.
Identifying Stains and Discoloration
Stains and discoloration can significantly detract from the appearance of a refinished bathtub. Common types of stains include rust, mineral deposits, and soap scum. Rust stains often originate from metal surfaces or fittings experiencing corrosion. Mineral deposits typically result from hard water, leaving behind unsightly marks. Soap scum can build up over time, especially in areas with regular soap use, leading to dullness in the bathtub’s finish.
Identifying the specific type of stain is crucial for effective remediation. Rust stains may require a specialized cleaner that targets iron oxide, while soap scum may be best treated with a gentle scrub using a mixture of vinegar and baking soda. For mineral deposits, a solution with citric acid can effectively break down the buildup. Proper cleaning techniques not only restore the visual appeal but also contribute to the longevity of the bathtub’s refinished surface.
Causes of Stains on Bathtub Finish
Stains on a bathtub finish can arise from a variety of sources. Hard water deposits are a common culprit, leaving behind unsightly mineral build-up. Additionally, soap scum accumulates over time, resulting in discoloration and dullness. Products containing dyes or strong pigments can also contribute to staining, as they tend to adhere to the bathtub surface.
Another factor to consider is the type of cleaning products used in maintenance. Some harsh chemicals may cause discoloration or cloudiness on certain finishes. Organic materials, such as hair or food residuals, can also cause stains if left unattended. Regular cleaning and maintenance help mitigate these issues, ensuring the bathtub retains its original appearance for longer.
Repairing Chips and Scratches
Chips and scratches can detract from the appearance of a refinished bathtub. To address minor damage, a touch-up kit specifically designed for bathtub refinishing can be effective. Start by cleaning the affected area thoroughly to remove any soap scum or dirt. After ensuring the surface is dry, apply the repair compound using a small brush, following the manufacturer’s instructions. Many kits come with color-matched options, which helps to blend the repaired areas with the surrounding finish.
For deeper chips, additional steps may be necessary. After applying the initial repair compound, it may be beneficial to sand the area lightly once it dries. Use fine-grit sandpaper for this task to ensure a smooth surface that seamlessly integrates with the rest of the bathtub. Once satisfied with the smoothness, clean the area again and reapply the topcoat if required. This method not only addresses the visible damage but also helps in maintaining the overall integrity of your bathtub’s finish.
Quick Fixes for Minor Damage
Minor chips and scratches on your bathtub can detract from its appearance but can often be addressed with simple fixes. For small nicks, use a bathtub repair kit that typically includes a color-matched epoxy or acrylic filler. Clean the damaged area thoroughly before application. Once the filler is applied, smooth it out using a putty knife and allow it to cure as per the manufacturer’s instructions.
For scratches, a fine-grit sandpaper can be used to gently buff the area. Sanding should be done in a consistent, circular motion to avoid creating more damage. After sanding, clean the surface again to remove dust and apply a polish or tub refinishing compound that matches your bathtub’s finish, restoring its shine and appearance. Regular maintenance helps keep minor damage at bay, extending the life of your bathtub’s finish.
Troubleshooting Odor Problems
Unpleasant smells can emanate from a refinished bathtub due to a variety of factors. One common source is moisture trapped underneath the newly applied coating. If the surface was not properly prepped or if the underlayers retained water, this can lead to mildew and foul odors. Another reason could be the chemicals used during the refinishing process. Improper ventilation while applying these substances may cause lingering smells, potentially affecting the bathroom’s air quality.
Identifying the exact source of the odor is essential for addressing the problem effectively. Start by checking for any visible signs of mold or mildew around the edges of the tub or in the surrounding area. If the issue stems from lingering chemicals, airing out the bathroom and using odor-absorbing products can help dissipate the smell. If persistent odors remain even after proper cleaning and ventilation, it may indicate deeper issues requiring professional attention.
Sources of Unpleasant Smells
Unpleasant smells in a refinished bathtub can stem from various sources, often linked to the materials and processes used during the refinishing project. If the surface wasn’t properly cleaned before applying the new finish, residues can create odor issues. Additionally, the chemicals in the refinishing products themselves can emit strong fumes, especially during the curing phase. Poor ventilation can exacerbate this problem, trapping those odors within the bathroom.
Another common source of unwanted smells is moisture buildup. If any underlying issues, like leaks or mold, are present before refinishing, they may become more pronounced after the new finish is applied. It’s essential to address any potential water damage and ensure the area is completely dry before starting a refinishing project. Failing to tackle these issues can lead to persistent odors and a less-than-perfect bathing experience.
When to Call a Professional
Recognizing when a DIY project has surpassed your skill set is essential for preventing further damage. If you encounter persistent issues such as bubbling, uneven surfaces, or significant discoloration after refinishing, it may indicate that the problem requires professional expertise. Complex damage or poor finish may not only affect the appearance but can also impact the durability of the bathtub, leading to additional costs down the line.
In cases where odor problems arise, or if the bathtub does not cure correctly despite following all manufacturer instructions, seeking professional assistance is advisable. An expert can diagnose the underlying issues and recommend effective solutions. Attempting to address these problems without the necessary experience can exacerbate the situation. It is better to invest in professional help than to risk compromising the integrity of your refinishing project.
Signs You May Need Expert Help
Signs that indicate you may need to call a professional include persistent bubbling or peeling of the newly refinished surface. These issues often stem from improper application techniques or inadequate surface preparation. If your attempts to resolve these problems with DIY methods fail, enlisting an expert can ensure that your bathtub not only looks good but also lasts longer without requiring further repairs.
Another sign pointing toward the need for professional assistance is an ongoing odor that does not dissipate. A lingering smell may be connected to curing issues or underlying plumbing problems. If cleaning and airing out the space do not mitigate the odor, seeking help can save you time and prevent further complications, ultimately restoring your bathtub to its intended condition.
Conclusion
Successfully refinishing a bathtub can breathe new life into an old fixture, enhancing the overall appearance of your bathroom. It requires diligence and attention to detail throughout the process. By familiarizing yourself with potential issues, you can navigate challenges with confidence, ensuring a smoother experience.
Maintaining your newly finished bathtub is equally important. Utilizing the right cleaning products and avoiding harsh chemicals can extend the life of the finish and keep your tub looking pristine. Regular checks for any signs of wear or damage will allow for timely repairs, preserving the beauty of your refinishing work for years to come.
FAQS
What are common issues I might encounter during DIY bathtub refinishing?
Common issues include bubbling and drips, curing problems, stains and discoloration, chips and scratches, and unpleasant odors.
How can I avoid bubbling and drips when refinishing my bathtub?
To avoid bubbling and drips, ensure you apply the refinishing material in thin, even coats, and follow the manufacturer’s instructions regarding temperature and humidity conditions.
What signs indicate that my bathtub is not curing properly?
Signs of incomplete curing may include a tacky surface, soft spots, or a dull appearance. If you notice these issues, it may be necessary to allow more time for curing or to adjust your application technique.
What should I do with leftover chemicals and waste after refinishing?
Leftover chemicals and waste should be disposed of according to local regulations. Many areas have specific guidelines for hazardous waste disposal, so check with your local waste management authority for safe disposal options.
When should I consider calling a professional for my bathtub refinishing project?
You should consider calling a professional if you notice persistent issues such as severe bubbling, significant discoloration, or if you’re unsure about how to address complex repairs like deep scratches or extensive damage.